Advanced plyometric cardio can boost performance but comes with risks. These high-intensity exercises, like depth jumps and single-leg hops, improve strength, agility, and metabolism but demand proper preparation to avoid injuries like ankle sprains or tendonitis. Here’s a quick breakdown of how to train safely:
- Pre-Workout Prep: Get medical clearance, assess your fitness (e.g., balance and squat tests), and perform a dynamic warm-up (light cardio, stretches, and low-intensity drills).
- Technique: Focus on soft landings using "triple flexion" (hips, knees, and ankles). Avoid loud landings or letting knees collapse inward.
- Limits and Progression: Train 2–3 times weekly with 120–140 foot contacts per session. Gradually increase difficulty without overloading.
- Common Mistakes: Don’t skip warm-ups, train through pain, or overdo volume. Fatigue leads to poor form and injuries.
- Environment: Use shock-absorbing surfaces (e.g., rubber flooring) and supportive footwear. Keep the area obstacle-free.
- Recovery: Allow 48–72 hours between sessions. Monitor soreness, vertical jump performance, and resting pulse to avoid overtraining.
Prioritize safety, focus on form, and give your body enough recovery to maximize results while minimizing risks.
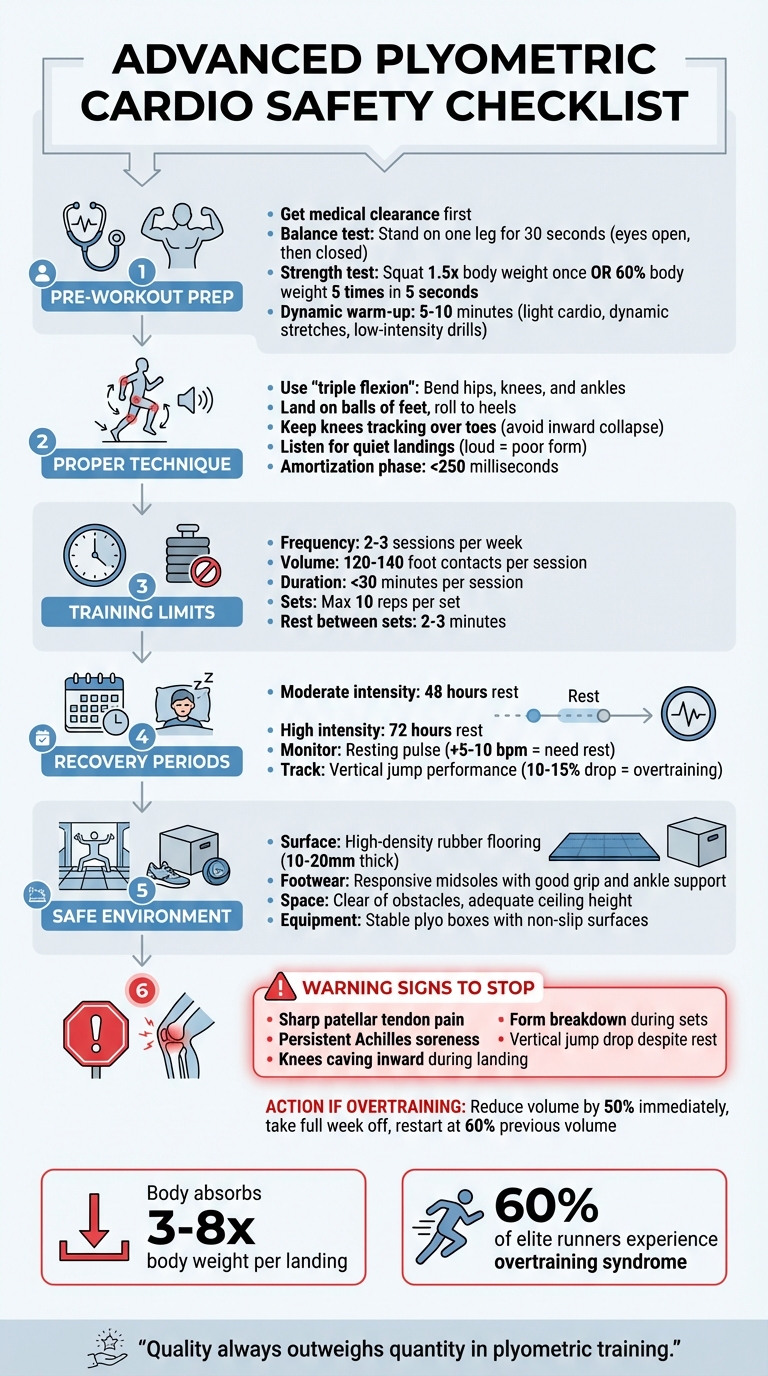
Advanced Plyometric Cardio Safety Checklist: 6-Step Guide
Pre-Workout Preparations
Health and Fitness Assessment
Get medical clearance first. Before diving into high-impact exercises like depth jumps or single-leg hops, schedule a check-up with your healthcare provider or physical therapist. They’ll evaluate whether you have any conditions – such as uncontrolled heart, bone, or metabolic disorders – that could make this type of training risky. It’s also crucial to assess your joint health, especially if you’ve dealt with ankle sprains, knee problems, or other injuries.
Check your readiness with simple tests. For balance, stand on one leg for 30 seconds with your eyes open, then closed. For strength, see if you can squat 1.5 times your body weight once or 60% of your body weight five times in five seconds. These tests ensure your muscles and connective tissues are prepared to handle the intense demands of plyometrics.
"Runners must possess adequate strength and stability to tolerate jump training."
- Kyle Norman, MS, Personal Trainer and Running Coach
Pain is a warning sign. If you’re dealing with active pain in your lower body or chronic discomfort, hold off on plyometric training. Mobility is another key factor – you need a full range of motion in all involved joints to safely land and generate power. For example, if a single-leg half-squat feels unstable or painful, it’s best to focus on building strength and stability first.
Once you’ve confirmed your fitness level, move on to a dynamic warm-up to prepare your body for explosive movements.
Dynamic Warm-Up Routine
Spend 5–10 minutes getting your body ready for plyometric exercises. Start with light cardio, like jogging or jumping jacks, to elevate your heart rate and body temperature. This activates your nervous system and gets you primed for action.
Follow up with dynamic stretches targeting key areas like the hips, ankles, and spine. Include movements like leg swings (both front-to-back and side-to-side), walking lunges with a twist, and standing hip circles. Don’t forget to loosen up your upper body with arm circles and cross-body swings.
Wrap up your warm-up with low-intensity drills such as pogo hops, high knees, and butt kicks. The focus here isn’t on jumping as high as possible but on landing softly, keeping your core engaged, and maintaining a tall posture.
"Plyos are a quick way to get warm, prime your body, and move better without needing much (or any) equipment at all."
- Calvin Trieu, Coach and Exercise Physiologist
Always perform your warm-up on forgiving surfaces like gym mats, turf, or grass to minimize joint impact. And if you’re feeling overly tired, stressed, or sleep-deprived, it’s better to skip the session altogether. Plyometric exercises place a heavy demand on your central nervous system, so rest when needed.
sbb-itb-9317277
Proper Technique and Form
Landing Mechanics
Did you know your body absorbs 3 to 8 times your body weight every time you land from a jump? That’s a lot of force, which is why proper landing mechanics are crucial. It’s not about how high you can jump – it’s about how safely and efficiently you can land. The secret lies in what experts call "triple flexion", which involves coordinated bending at the hips, knees, and ankles. This technique helps distribute the impact across your muscles, sparing your joints from unnecessary strain.
When landing, aim for a soft, controlled motion. Start by landing on the balls of your feet, then smoothly roll back to your heels. Pay close attention to your knees – they should track directly over your toes. Letting your knees collapse inward (a condition known as knee valgus) greatly increases your risk of ACL injuries. In fact, studies show that female athletes are 2 to 8 times more likely to suffer ACL tears, often due to poor landing habits.
"Landing is where athletic performance meets physics. Each time an athlete jumps and returns to the ground, their body absorbs forces anywhere from 3 to 8 times their body weight."
Here’s a pro tip: listen to your landings. If you hear a loud thud, it’s a sign your joints are taking the brunt of the impact instead of your muscles. To avoid this, lean your torso slightly forward to activate your glutes and hamstrings, which help reduce stress on your knees. Before advancing to more dynamic jumps, practice "stick" landings. Hold your landing position for 2–3 seconds to ensure you have full control. Mastering this technique lays the groundwork for safer, more explosive movements.
Controlled Movements
Once your landing mechanics are solid, the next step is to focus on controlled, precise movements. Control doesn’t mean slowing down – it’s about executing each phase with precision. For example, the amortization phase (the time between landing and takeoff) should be lightning-fast – ideally under 250 milliseconds. If this phase drags on, you risk losing stored energy as heat, which diminishes the effectiveness of your jump.
"If the amortization phase is delayed, the stored energy is wasted as heat, the stretch reflex is not activated and the resultant positive work of the concentric contraction is not as effective."
- Robert Manske, PT, DPT, SCS, ATC, MEd, CSCS, Wichita State University
The muscle-tendon unit plays a huge role here, contributing 70% to 75% of the force generated during plyometric movements. To maximize this, keep your core engaged and your spine neutral during both takeoff and landing. Fatigue is your enemy – when your form starts to break down, it’s time to stop. Poor technique under fatigue is a fast track to injury.
If you’re unsure about your form, practice in front of a mirror to catch any alignment issues. And always perform plyometric exercises at the beginning of your workout when your nervous system is fresh. This attention to detail ensures that every phase of your movement is controlled, completing the cycle of safe and effective plyometric training.
Landing Mechanics | PLYOMETRIC SERIES
Exercise Limits and Progression
Once you’ve nailed your warm-ups and technique, it’s time to focus on progressing safely with these key guidelines.
Volume and Frequency Guidelines
For advanced plyometric training, stick to 2–3 sessions per week to allow for proper recovery. Your nervous system needs time to bounce back from the heavy demands of explosive movements. Plan for at least 48 hours of rest between moderate-intensity sessions and 72 hours after high-intensity workouts.
Keep your sessions efficient: aim for 120–140 foot contacts per session (since each jump involves two landings). Keeping sessions under 30 minutes ensures you maintain quality while avoiding neurological fatigue. As Alexandria Clearwater, NFPT, puts it, "Plyometric training is largely neurologic; a client shouldn’t be left gasping for air".
For rest between sets, allow 2–3 minutes to replenish your creatine phosphate stores. Limit sets to 10 reps max, and stop immediately if your form starts to break down.
Gradual Progression
Progression in plyometrics is all about building a strong base before tackling more advanced moves. Start by mastering 10 consecutive jumps with perfect form, focusing on quiet and controlled landings. You should also be able to perform a single-leg squat to 60° and land from a 12-inch box with proper alignment – these are crucial prerequisites for advancing.
When you’re ready to take it up a notch, follow the "one variable" rule: adjust either the height or the complexity of the movement, but never both at the same time. Pay attention to warning signs like a drop in vertical jump performance, sharp patellar tendon pain, or lingering Achilles soreness. These are signals to dial back the intensity.
With six weeks of consistent plyometric training, you could see up to a 10% increase in leg strength – but only if you stick to gradual progression and give your body adequate time to recover. Taking these steps not only keeps your joints safe but also prepares your body for better recovery and long-term gains.
Common Mistakes to Avoid
Even seasoned athletes can slip up during training, turning what should be a productive session into a potential injury risk. Spotting these missteps early is crucial for staying on track and keeping your plyometric training both effective and safe.
Skipping Warm-Ups
Skipping a proper warm-up before diving into advanced plyometric exercises is a recipe for trouble. Without it, you risk disrupting your stretch-shortening cycle – the mechanism that powers explosive movements. A structured warm-up not only preps your muscles but also gets your nervous system ready for the demands of plyometric training.
Timing matters, too. Performing plyometrics at the wrong point in your workout can lead to poor form. For example, doing them after heavy conditioning or at the end of a session can compromise your performance. As Melissa Witmer, Strength and Conditioning Coach, points out:
"Plyometric training shouldn’t be done in isolation, but as part of a complete training program that includes strength training."
Static stretching before plyometrics is another common mistake. It doesn’t adequately activate your nervous system for explosive movements. Poor pacing or ignoring pain during training further increases the risk of injury.
Overtraining and Ignoring Pain
Overtraining or pushing through pain can derail your progress in a big way. Research indicates that around 60% of elite runners and 33% of non-elite runners experience overtraining syndrome at some point. Recovery can take weeks – or even months – with training capacity dropping by 50% to 60%. Ignoring warning signs, like sharp pain in your patellar tendon or persistent soreness in your Achilles, can lead to stress building up faster than your tendons can recover.
Another mistake is treating plyometrics like a cardio workout. Dr. Ben Bagge from Pro+Kinetix Physical Therapy cautions:
"The goal of plyometrics is to increase force production and decrease reaction time, not improve conditioning. In fact, when performed for cardio… plyos can actually do more harm than good."
If you notice a drop in your vertical jump height despite getting enough rest, it could signal overtraining. In such cases, take a full week off from advanced plyometrics and resume at about 60% of your previous volume. Similarly, if your knees start caving inward during landings – a clear sign of poor form – cut your training volume by at least 50% and give yourself 48 to 72 hours of complete rest before returning to training. Keeping a log of your mood, muscle soreness, and performance metrics can help you catch these red flags early, preventing them from turning into chronic issues.
Safe Exercise Environment
Creating a safe exercise environment is just as important as mastering technique and progression when it comes to advanced plyometric movements. A well-prepared space not only reduces the risk of injury but also helps you perform at your best.
Surface and Footwear Considerations
The type of surface you train on plays a huge role in both safety and performance. High-density rubber flooring is one of the best options for plyometric exercises because it provides a balance of shock absorption and stability. Richard McKay, Founder of Sprung Gym Flooring, emphasizes:
"For impact exercise you want an adequate level of shock absorption while providing a firm surface to work out."
For optimal results, go with rubber flooring that’s 10–20 mm (0.4–0.8 inches) thick. If you’re working with heavier loads, the 20 mm (0.8 inches) thickness is ideal. For outdoor training, grass can work as a natural alternative due to its cushioning properties, but be cautious of uneven areas that could lead to missteps. On the flip side, avoid hard surfaces like concrete, tile, or asphalt, as they lack cushioning and can put unnecessary strain on your joints.
Footwear matters just as much as flooring. Look for training shoes with responsive midsoles, good grip, and solid ankle support to complement your floor and keep you steady during quick movements. If you’re more advanced, minimalist shoes can enhance power transfer, but stick with supportive options while you’re still refining your technique.
Once you’ve locked in the right surface and shoes, it’s time to focus on the rest of your training area.
Space and Equipment Safety
Your workout space should be free of obstacles to ensure smooth, uninterrupted movements. Check that the ceiling height is sufficient to avoid accidental collisions. If you’re incorporating plyo boxes into your routine, stability is non-negotiable. Steel boxes with a tapered design (wider at the base) offer extra stability, while wooden boxes should have rounded or sanded edges to minimize shin injuries.
For added safety, make sure plyo boxes have a non-slip surface. If they don’t, you can apply grip tape or rubber matting to prevent slips. Always place your equipment on rubber flooring or non-slip mats to keep them from shifting during high-impact exercises. Adding a mirror to your workout area can also be helpful – it allows you to monitor your landing mechanics in real time and correct any errors before they become bad habits.
Recovery and Progress Monitoring
Even with flawless technique and a controlled environment, your body needs time to recover in order to adapt to advanced plyometric training. Recovery is essential for preventing overtraining or injury while supporting steady progress.
Rest and Recovery Periods
High-impact plyometric workouts place significant strain on muscles, tendons, and the nervous system. To allow for proper recovery, schedule 48 to 72 hours between sessions. Moderate-intensity routines usually need 48 hours, whereas high-intensity drills may require a full 72 hours for optimal recovery. Limiting the number of plyometric sessions each week can also help reduce the risk of overuse injuries.
During workouts, rest periods are key. For moderate sessions, take 1–2 minutes of rest between sets, while advanced drills may need 2–3 minutes to maintain explosive performance. On rest days, consider active recovery activities like walking, light cycling, or yoga to promote blood flow without adding extra strain.
For advanced athletes, the volume of foot contacts (the number of times your feet hit the ground) should be monitored. High-intensity sessions typically involve 100–140 foot contacts, while lower-intensity routines can go up to 200 contacts. To support tendon repair, as outlined in earlier safety discussions, advanced athletes might benefit from consuming 10–15 grams of collagen paired with 500–1,000 mg of Vitamin C about 30–60 minutes before training.
Tracking Symptoms and Adjustments
Keeping an eye on your recovery is crucial for managing your training load. Pay attention to your body – sharp pain near the base of your kneecap or ongoing soreness in your Achilles tendon could indicate tendon overload. If these symptoms occur, reduce your training volume by 50% immediately.
Another useful tool is monitoring your morning resting pulse. If it increases by 5–10 beats per minute above your usual baseline, it’s a sign that your body may need additional recovery time. Similarly, a 10–15% drop in your vertical jump performance can signal accumulated fatigue. As True Sports Physical Therapy explains:
"If your vertical jump height drops despite recovery days, you’re accumulating fatigue faster than adaptation occurs. Take a full week off plyometrics, then restart at 60% previous volume".
Mental cues, such as irritability, lack of motivation, or difficulty sleeping, can also indicate that your nervous system is under too much stress. Use these metrics to make real-time adjustments to your training. If your form begins to break down during a set, stop immediately – each rep must be performed with consistent technique to avoid injury.
Conclusion
Advanced plyometric training can lead to impressive performance improvements, but only when safety is prioritized every step of the way.
Start with a 5–10 minute dynamic warm-up and build a base of foundational strength training. This preparation is critical to protect your joints and muscles from injuries like tendonitis and other overuse problems. Skipping this step increases the risk of preventable setbacks, while a strong foundation sets the stage for explosive, precise movements.
When performing plyometrics, focus on proper technique and soft, controlled landings to safeguard your joints. Patrick Dale, Training Editor at Fitness Volt, highlights the importance of consistent effort:
"If you want to move fast and become more explosive, that’s the way you need to work out… your first rep should look the same as your last".
In plyometric training, quality always outweighs quantity.
Recovery is just as crucial. Allowing 48–72 hours between sessions gives your body the time it needs to repair and grow stronger. Keep an eye on your vertical jump performance and pay attention to any pain or discomfort – these are key indicators to adjust your training load before small issues escalate into serious problems.
FAQs
Am I ready for advanced plyometrics?
Before diving into advanced plyometric exercises, make sure your body is ready. Here’s what to check: you should have no pain in your lower extremities, maintain full range of motion in your joints, and successfully balance on one leg for 30 seconds – both with eyes open and closed. Additionally, you should be able to perform full squats and lunges without pain. If any of these criteria aren’t met, prioritize building your strength and stability first before moving on to more challenging exercises.
How can I tell if I’m overtraining?
Persistent fatigue, mood swings, trouble sleeping, an elevated resting heart rate, constant muscle soreness, and a drop in performance – these are all signs that you might be overtraining. If you’re pushing harder but seeing fewer results or feeling completely burnt out, it’s time to take a step back. Adjust your workouts, focus on rest, and develop a solid recovery plan to avoid injuries and long-term burnout. Your body needs time to repair and recharge.
What plyo exercises should I start with?
Beginners looking to incorporate plyometric exercises should start with low-impact movements to develop strength and refine their technique. Good starting points include squat jumps, low box jumps, and step jumps. As you grow more confident and your body adapts, you can gradually add drills like jump rope or single-leg jumps to your routine. Always emphasize controlled movements and make safety your top priority to reduce the risk of injury as you progress.